Wednesday, September 30, 2015

Backup and Restore MS SQL SERVER DB to MS-Azure using Powershell

Backup-SQLAzureDB.ps1

This is a very simple script allowing you to specify the connection string of your SQL Azure server, the database you wish to export and the output filename for the bacpac file. Note that this assumes that you have installed SQL Server Management Studio 2012 under: C:\Program Files (x86)\Microsoft SQL Server (if this isn't the case you can simply specify the optional -SqlInstallationFolder parameter with the correct path).
Syntax:
.\Backup-SQLAzureDB.ps1 -ConnectionString "Server=tcp:….database.windows.net,1433;Database=MyDb;User ID=something@server;Password=pwd;Trusted_Connection=False;Encrypt=True;Connection Timeout=30;" -DatabaseName "MyDB" -OutputFile "C:\backup.bacpac"
param([string]$ConnectionString = $(throw "The ConnectionString parameter is required."),  
      [string]$DatabaseName = $(throw "The DatabaseName parameter is required."),
      [string]$OutputFile = $(throw "The OutputFile parameter is required."), 
      [string]$SqlInstallationFolder = "C:\Program Files (x86)\Microsoft SQL Server")

# Load DAC assembly.
$DacAssembly = "$SqlInstallationFolder\110\DAC\bin\Microsoft.SqlServer.Dac.dll"
Write-Host "Loading Dac Assembly: $DacAssembly"  
Add-Type -Path $DacAssembly  
Write-Host "Dac Assembly loaded."

# Initialize Dac service.
$now = $(Get-Date).ToString("HH:mm:ss")
$Services = new-object Microsoft.SqlServer.Dac.DacServices $ConnectionString
if ($Services -eq $null)  
{
    exit
}

# Start the actual export.
Write-Host "Starting backup at $DatabaseName at $now"  
$Watch = New-Object System.Diagnostics.StopWatch
$Watch.Start()
$Services.ExportBacpac($OutputFile, $DatabaseName)
$Watch.Stop()
Write-Host "Backup completed in" $Watch.Elapsed.ToString()  
At the end of the backup the script will show how long it took:

Restore-SQLAzureDB.ps1

This script is very similar to the previous script. But instead of calling the BackupBakpac method this script calls theImportBakpac method allowing you to use a local *.bacpac file to create a new database.
param([string]$ConnectionString = $(throw "The ConnectionString parameter is required."),  
      [string]$DatabaseName = $(throw "The DatabaseName parameter is required."),
      [string]$InputFile = $(throw "The InputFile parameter is required."), 
      [string]$SqlInstallationFolder = "C:\Program Files (x86)\Microsoft SQL Server")

# Load DAC assembly.
$DacAssembly = "$SqlInstallationFolder\110\DAC\bin\Microsoft.SqlServer.Dac.dll"
Write-Host "Loading Dac Assembly: $DacAssembly"  
Add-Type -Path $DacAssembly  
Write-Host "Dac Assembly loaded."

# Initialize Dac service.
$now = $(Get-Date).ToString("HH:mm:ss")
$Services = new-object Microsoft.SqlServer.Dac.DacServices $ConnectionString
if ($Services -eq $null)  
{
    exit
}

# Start the actual export.
Write-Host "Starting restore to $DatabaseName at $now"  
$Watch = New-Object System.Diagnostics.StopWatch
$Watch.Start()
$Package =  [Microsoft.SqlServer.Dac.BacPackage]::Load($InputFile)
$Services.ImportBacpac($Package, $DatabaseName)
$Package.Dispose()
$Watch.Stop()
Write-Host "Restore completed in" $Watch.Elapsed.ToString()  
Tuesday, September 8, 2015

Data Tier to Migrate MS SQL Server local DB to on-premises MS SQL Server

Export SQL Azure Data Using SSMS

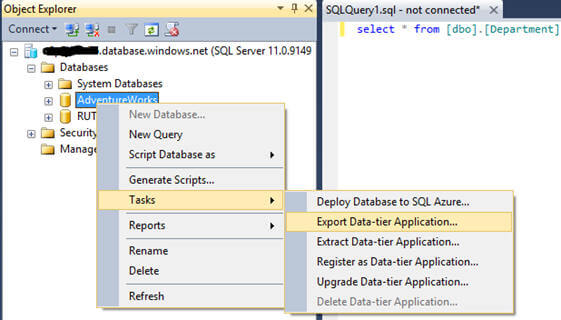
This is not all, you can even use SQL Server Management Studio (SSMS) to connect to the Windows Azure SQL Database server and then export the database using SSMS as well. It even provides more granular controls like, you can select the local file location for the BACPAC file as well as specify which objects you want to export. To do that, right click on the database in Object Explorer of SSMS and go to Tasks and then click on Export Data-tier Application as shown below:
you can even use SQL Server Management Studio (SSMS) to connect to the Windows Azure SQL Database server
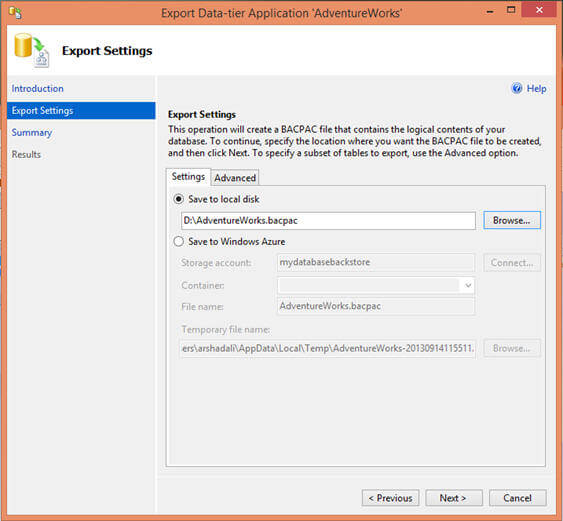
On the Export Data-tier application wizard, specify the location for the BACPAC file which could be either a local file location or Windows Azure blob storage account as shown below:
specify the location for BACPAC file which could be either local file location or Windows Azure blob storage account
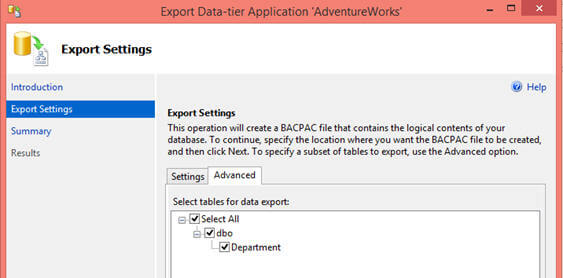
On the Advance tab of the Export Data-tier Application wizard, you can select which database objects you want to export. In my case, as I have just one table in the database this is how it looks: 
On the Advance tab of the Export Data-tier Application wizard, you can make choice of database objects which you want to export.
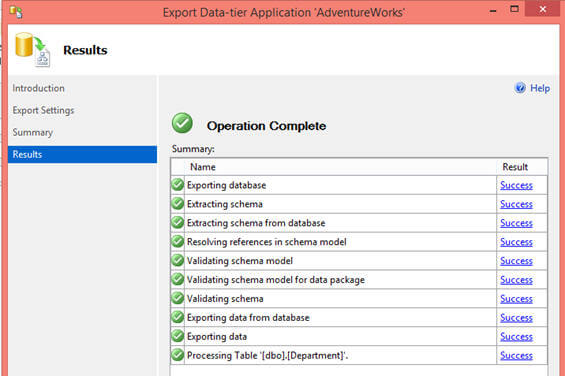
Click on the Finish button to start the export operation and once it is completed, your screen should look similar to this:  
Click on Finish button to start the export operation

Getting a Transactional Consistent Backup

There is an important point to note here, the export operation performs a bulk copy operation on each individual table (or on selected tables if you are using SSMS) in the database and hence it does not guarantee the transactional consistency of the data. So, how do we get a transactional consistent BACPACK file?
The first option is to set the database to READ-ONLY mode, export the data to a BACPAC file and then set it back to READ-WRITE mode. But what if you cannot do that as you want your database to be fully available during export operation?
The second option is to create a database copy of the Windows Azure SQL database (which is actually a consistent copy of your original\source database at the time when it completes) and then perform an export operation from the copy of the database. Note that the SQL Database copy process is asynchronous and runs in the background without resulting in any downtime for the source database.
There are pros and cons of each of these options - in the first option, as we are not creating a copy of the existing database it does not involve additional cost but at the same time it does not guarantee the transactional consistency of the data. If we have to put the database in read-only mode to guarantee the transactional consistency of the data we are again reducing the usage time for the database for write operations. The second choice may be better as it does not impact the write operations of the database, but while you are creating another copy of the database there would be a cost involved for this second copy of the database.
SQLPackage.exe (Data-Tier Application client tool) is a command line utility that can be used to export or import a BACPAC file. For more information, see SqlPackage.exe.

Windows Azure SQL Database - Import

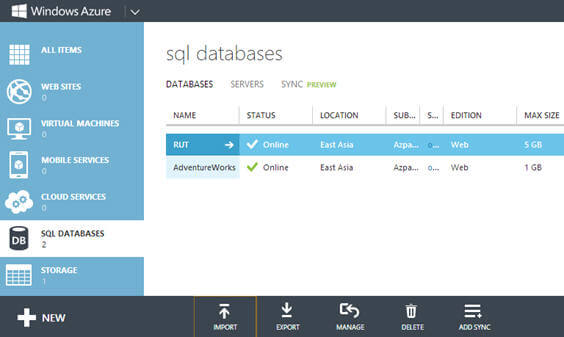
If you have a BACPAC file, you can then restore\recreate the database on the same Windows Azure SQL Database server or another Windows Azure SQL Database server or an on-premises instance of the SQL Server Database Engine. Windows Azure SQL Database has an import service to import from the BACPAC file. On the Windows Azure portal, under SQL Databases section click on the Import link available at the bottom as shown below:
Windows Azure SQL Database - Import
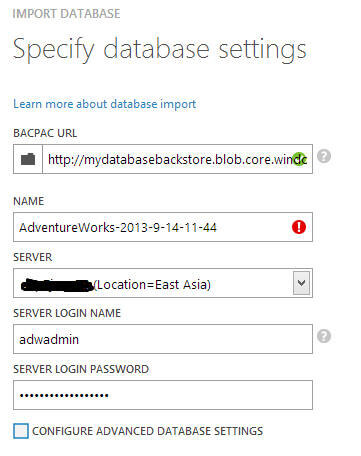
Clicking on the Import icon will bring up the following screen, here you need to select the BACPAC file, specify the name of the database to be created and server information as shown below. If you check "Configure Advance Database Settings" it will allow you to specify the edition of the database you want to create (Web or Business) and size of database:
Clicking on the Import icon as above will bring up this screen, here you need to select the BACPAC file
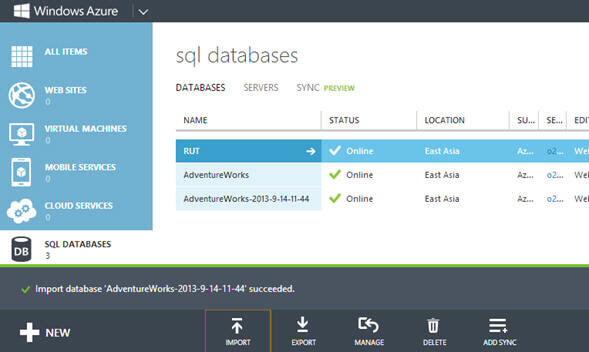
When you start the import operation, you can monitor the progress as shown below:
When you start the import operation, you can monitor the progress
Once the import operation is successfully completed, you can see your new database as shown below:
Once the import operation is successfully completed, you can see your new database after the import
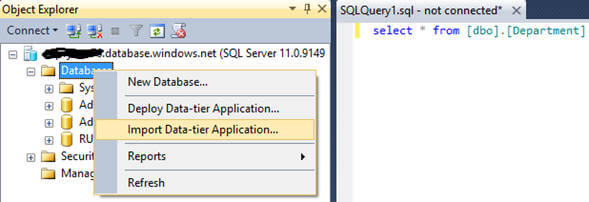
Like export, SSMS allows importing the database from a BACPAC file. To launch it, right click on the Database node in the Object Explorer of SSMS then click on Import Data-tier Application menu item as shown below:
SSMS allows importing the database from the BACPAC file.
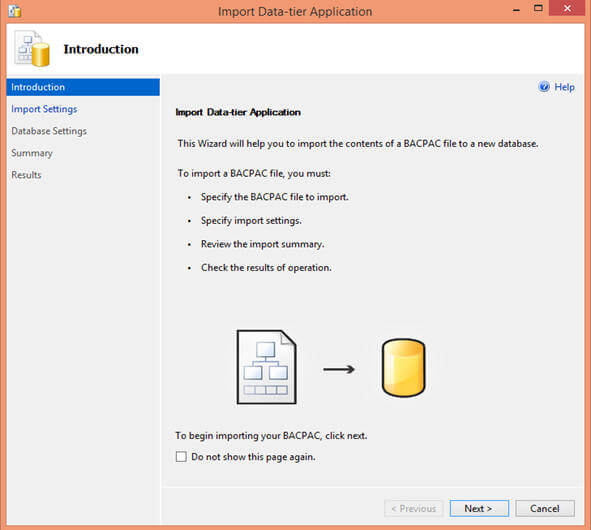
On the first screen of the Import Data-tier Application wizard, just click on Next button to move to the next screen of the wizard:
On the first screen of the Import Data-tier Application wizard, just click on Next button to move on to the next screen of the wizard
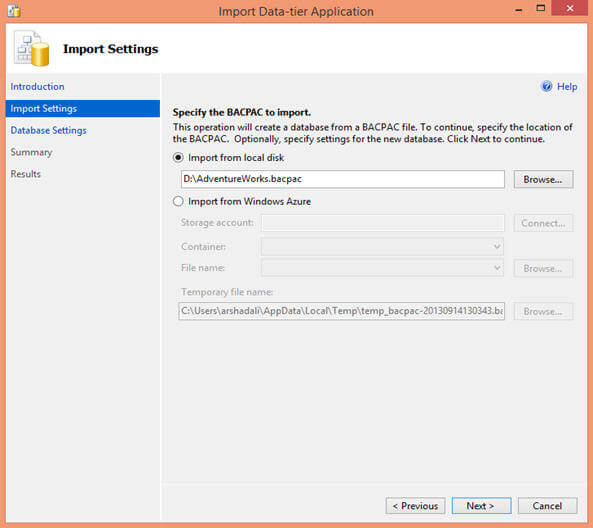
On the Import Settings screen of the wizard specify the location of the BACPAC file (BACPAC file could be from local file system or Windows Azure blob storage) and then click on the Next button to move ahead:
On the Import Settings screen of the wizard specify the location of the BACPAC file
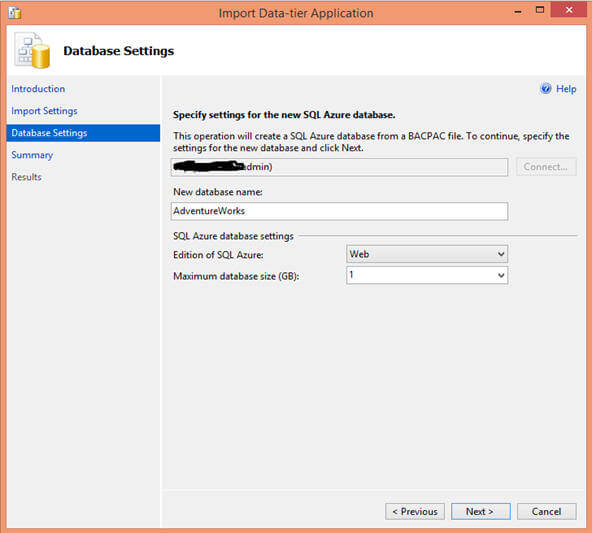
On the Database Settings screen of the Import Data-tier Application, specify the server instance, edition and maximum size of the database to be created as shown below:
On the Database Settings screen of the Import Data-tier Application, specify the server instance and then edition
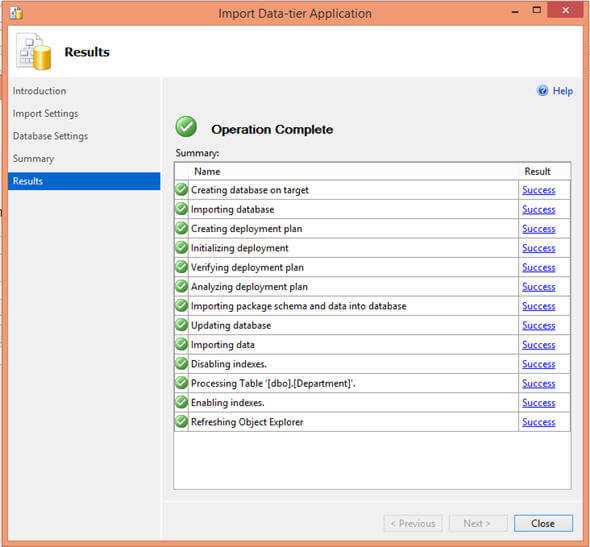
The Import Data-tier Application wizard should look like this after completion of the import operation from the BACPAC file. 
The Import Data-tier Application wizard should like this after completion of the import operation from BACPAC file

Windows Azure SQL Database - Automating Exports

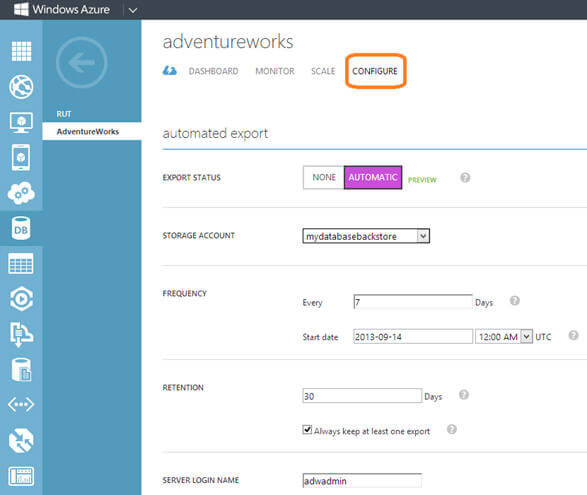
Windows Azure SQL Database provides a mechanism for automating the process for exporting a database to BACPAC files on a set interval and frequency. In order to set up the automatic export process, go to the Configure page of the database on the Windows Azure portal and select Automatic as shown below. Next you can specify the storage account where the BACPAC files will be stored after export, authentication mechanism to connect for exporting, frequency of export and retention settings for the BACPAC files:
Windows Azure SQL Database - Automating export