Wednesday, May 27, 2015

Azure Automation to Run a VM

If you don’t already have an Automation account, create a new Automation account in the Azure Portal, by navigating to New > Management > Automation and completing the required details.
image
Once you’ve created an account you’ll see it listed in the Automation Accounts blade.
image
Clicking on the Automation Account shows all of its details, allowing you to view and create the various resources, and see monitoring information for jobs.
image
In order to execute PowerShell scripts, whether they are regular scripts, Workflows, DSC or graphical runbooks, you need some form of credential. There is now a specific Automation resource for defining Credential assets. In the older post on this subject, certificates were used for authentication, but Azure Active Directory could also have been used to create a user with access to the subscription.
In this guide we will use an Azure RM AD service principal. With this you can assign fine grained role based access to the resources in your Azure directory. For example the service principal could be assigned the “VM Contributor” role for a specific resource group only. Or it could be assigned full access to an entire subscription. There are many built-in roles and you can define custom roles as well.
To learn how to create the service principal, follow the steps from a previous post.
Once you have a service principal, you can assign it to a particular resource with a particular role. For example navigate to the Subscriptions blade, and click on the Subscription you want it to have access to. Near the top right of this blade, there is a set of icons. Click on the “Access” icon (looks like two people and is highlighted red in the image). This allows you to assign user access.
image
From there select a role and add the service principal user. You can use the search box on the Add Users blade to find your service principal.
image
Now that the service principal has been given access to the subscription, an Automation Credential can be created. From the Automation account blade, navigate to Assets then Credentials and click the “Add a credential” button. Enter your service principal details.
image
Time to create the Runbooks! From the Automation blade in the portal navigate to Runbooks then click the “Browse Gallery” button. We’ll be using pre-existing graphical runbooks available in the gallery, built by the Automation product team. If you search for the text “azure arm vms” you’ll see the two Runbooks we’ll be using for this guide.
image
Clicking on the “Stop Azure ARM VMs” brings up a view that shows the graphical runbook in all it’s glory.
image
Clicking the “Import” button will bring this graphical runbook into your Automation account and allow you to alter, test and publish it.
image
Clicking the “Test pane” button will allow you to fill in the parameters the runbook requires and start the runbook and see the output. The parameters this runbook needs are:
  • Resource Group name
  • Azure Subscription Id Asset name
  • Azure Credential Asset name
  • VM name
image
The Credential Asset was made in a previous step. You’ll need to create a new Variable Asset for the subscription id.
image
If you successfully enter the parameters and test the runbook, you should see output that says it is Completed and that the VM has been stopped.
image
Once you’ve successfully tested the runbook, you can hit the “Publish” button.
Now that we have a published runbook to stop a virtual machine, we need to link it to a  schedule, so the runbook starts automatically when we want it to.
From the Runbook blade, click the “Schedule” button, then “Add a Schedule”. First you need to set up a schedule to link to the this runbook. You can use an existing schedule or create a new one. When creating a new schedule you need to enter a name and when it should run e.g. daily at 20:00.
image
The parameters that will be given to the runbook on this scheduled run then need to be populated as well.
image
Once the schedule has been created, you’ll see that schedule on the runbook blade.
image

Wednesday, May 13, 2015

Azure Active Directory Protocols

Protocols Supported by Azure AD

As a developer building applications protected by Azure AD you will find that Azure AD provides support for all the common protocols that can be used to secure your applications. Some of these protocols have been around for a really long time and as a result are widely used in the industry today. Others are still emerging as a new (and preferred) way to protect access to cloud applications. The protocols supported are shown here:
  • WS-Federation – This is arguably one of the most well-known and used protocol today for authenticating users of web applications. Microsoft uses this when authenticating users for some of their own cloud applications, such as the Microsoft Azure Management portal, Office 365, Dynamics CRM Online, and more. There is fantastic tooling support in Visual Studio 2010, 2012, and 2013 for this protocol making it very easy for developers to protect their applications using Azure AD. The token format used in this protocol is SAML.
  • SAML-P – This is also a widely adopted protocol and follows a very similar authentication pattern to WS-Federation. However, it does not get the same level of tooling support that WS-Federation gets. The token format used in this protocol is also SAML.
  • OAuth 2.0 – This is an authorization protocol that has been quickly and widely adopted in the industry as a way to sign-in users using their credentials at popular web applications such as Facebook, Twitter, and other “social” applications. Some of the benefits of this protocol is its smaller token format, JSON Web Token (JWT), and application scenarios it simplifies such as accessing Web API’s from a native client with an access token. To do the latter with WS-Federation or SAML-P involves a lot of intricate code and configuration.
  • OpenID Connect – This is a protocol that adds an authentication layer on top of the existing OAuth 2.0 protocol. Because it is layered on OAuth 2.0, it benefits from the highly efficient JWT token format that OAuth 2.0 uses.

Tuesday, May 12, 2015

Developing ASP.NET application using Active Directory in Azure

Create an ASP.NET Application

The following steps use Visual Studio Express 2013 for Web, and requires Visual Studio 2013 Update 3.
  1. In Visual Studio, click File and then New Project. On the New Project dialog, select the Visual C# Web project from the left menu and click OK. You may also want to uncheck the Add Application Insights to Project if you don't want the functionality for your application.
  2. In the New ASP.NET Project dialog, select MVC, and then click Change Authentication.

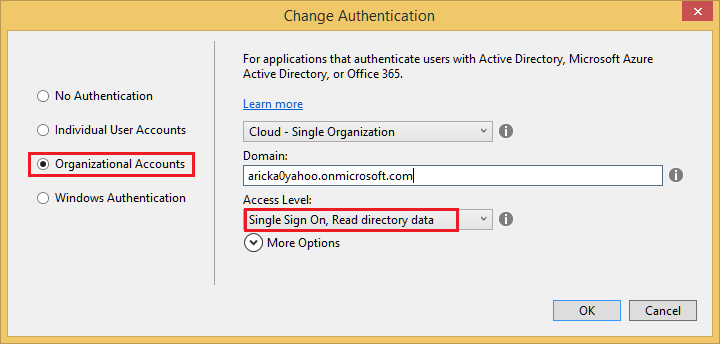
  3. On the Change Authentication dialog, select Organizational Accounts. These options can be used to automatically register your application with Azure AD as well as automatically configure your application to integrate with Azure AD. You don't have to use theChange Authentication dialog to register and configure your application, but it makes it much easier. If you are using Visual Studio 2012 for example, you can still manually register the application in the Azure Management Portal and update its configuration to integrate with Azure AD.
    In the drop-down menus, select Cloud - Single Organization and Single Sign On, Read directory data. Enter the domain for your Azure AD directory, for example (in the images below)  aricka0yahoo.onmicrosoft.com, and then click OK. You can get the domain name from the Domains tab for the Default Directory on the azure portal (see the next image down).


    The following image shows the domain name from the Azure portal.


    Note: You can optionally configure the Application ID URI that will be registered in Azure AD by clicking More Options. The App ID URI is the unique identifier for an application, which is registered in Azure AD and used by the application to identify itself when communicating with Azure AD. For more information about the App ID URI and other properties of registered applications, see this topic. By clicking the checkbox below the App ID URI field, you can also choose to overwrite an existing registration in Azure AD that uses the same App ID URI.
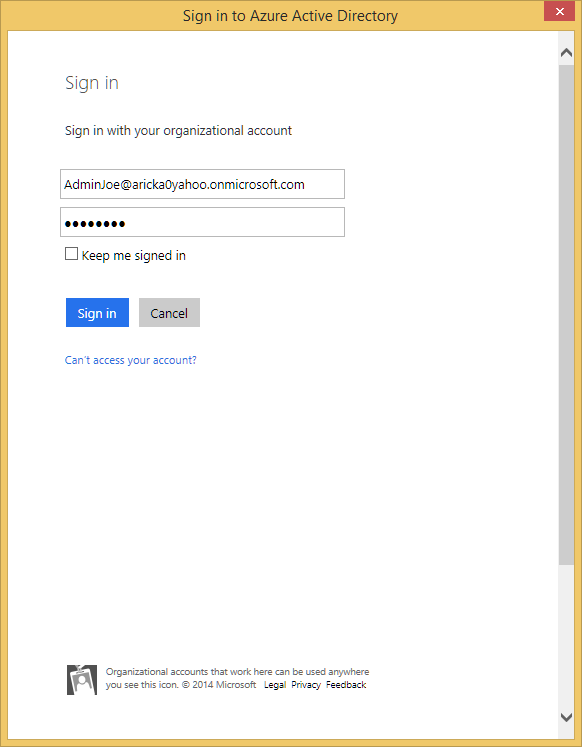
  4. After clicking OK, a sign-in dialog will appear, and you'll need to sign in using a Global Administrator account (not the Microsoft account associated with your subscription). If you created a new Administrator account earlier, you'll be required to change the password and then sign in again using the new password.

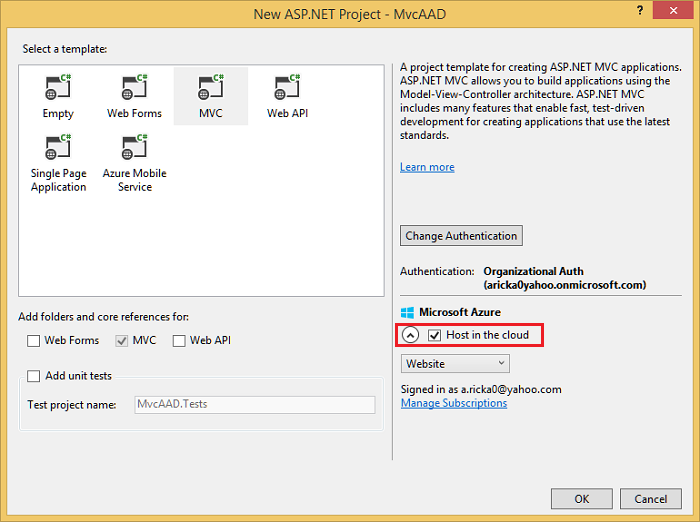
  5. After you've successfully authenticated, the New ASP.NET Project dialog will show your authentication choice (Organizational ) and the directory where the new application will be registered (aricka0yahoo.onmicrosoft.com in the image below). Below this information, select the checkbox labeled Host in the cloud. If this checkbox is selected, the project will be provisioned as an Azure web app and will be enabled for easy publishing later. Click OK.

  6. The Configure Azure Website dialog will appear, using an auto-generated site name and region. Also note the account you're currently signed into in the dialog. You want to make sure that this account is the one that your Azure subscription is attached to, typically a Microsoft account.
    Note: This project requires a database. You need to select one of your existing databases, or create a new one. A database is required because the project already uses a local database file to store a small amount of authentication configuration data. When you deploy the application to an Azure Website, this database isn't packaged with the deployment, so you need to choose one that's accessible in the cloud. Click OK.

  7. The project will be created, and your authentication options and web app options will be automatically configured with the project. Once this process has completed, run the project locally by pressing ^F5. You will be required to sign in using your organizational account. Provide the username and password for the account you created earlier and click Sign in.

  8. After successful sign in, the ASP.NET site will show that you've authenticated by displaying the username in the top right corner of the page.


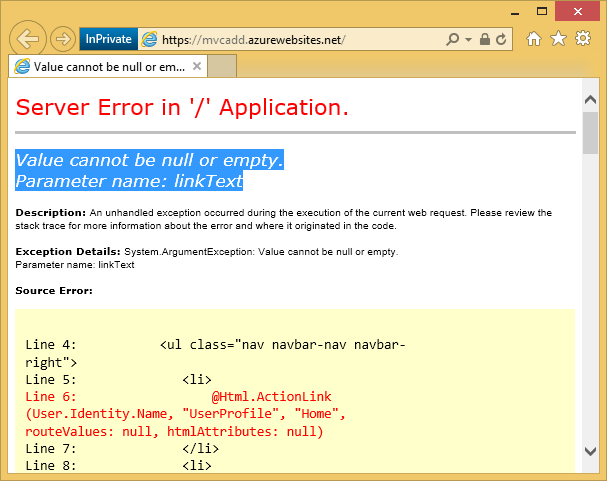
    If you get the error:
          Value cannot be null or empty. Parameter name: linkText


    see the debug section at the end of the tutorial.

Basics of the Graph API

The Graph API is the programmatic interface used to perform CRUD and other operations on objects in your Azure AD directory. If you select an Organizational Account option for authentication when creating a new project in Visual Studio 2013, your application will already be configured to call the Graph API. This section briefly shows you how the Graph API works.
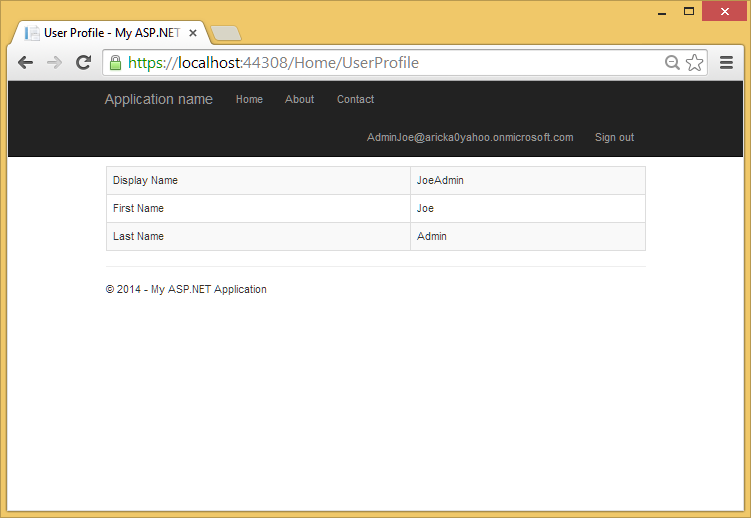
  1. In your running application, click on the name of the signed-in user at the top right of the page. This will take you to the User Profile page, which is an action on the Home Controller. You'll notice that the table contains user information about the administrator account you created earlier. This information is stored in your directory, and the Graph API is called to retrieve this information when the page loads.

  2. Go back to Visual Studio and expand the Controllers folder and then open the HomeController.cs file. You'll see a UserProfile() action that contains code to retrieve a token and then call the Graph API. This code is duplicated below:
        [Authorize]
        public async Task UserProfile()
        {
            string tenantId = ClaimsPrincipal.Current.FindFirst(TenantIdClaimType).Value;
    
            // Get a token for calling the Azure Active Directory Graph
            AuthenticationContext authContext = new AuthenticationContext(String.Format(CultureInfo.InvariantCulture, LoginUrl, tenantId));
            ClientCredential credential = new ClientCredential(AppPrincipalId, AppKey);
            AuthenticationResult assertionCredential = authContext.AcquireToken(GraphUrl, credential);
            string authHeader = assertionCredential.CreateAuthorizationHeader();
            string requestUrl = String.Format(
                CultureInfo.InvariantCulture,
                GraphUserUrl,
                HttpUtility.UrlEncode(tenantId),
                HttpUtility.UrlEncode(User.Identity.Name));
    
            HttpClient client = new HttpClient();
            HttpRequestMessage request = new HttpRequestMessage(HttpMethod.Get, requestUrl);
            request.Headers.TryAddWithoutValidation("Authorization", authHeader);
            HttpResponseMessage response = await client.SendAsync(request);
            string responseString = await response.Content.ReadAsStringAsync();
            UserProfile profile = JsonConvert.DeserializeObject<UserProfile>(responseString);
    
            return View(profile);
        }
    To call the Graph API, you first need to retrieve a token. When the token is retrieved, its string value must be appended in the Authorization header for all subsequent requests to the Graph API. Most of the code above handles the details of authenticating to Azure AD to get a token, using the token to make a call to the Graph API, and then transforming the response so that it can be presented in the View.
    The most relevant portion for discussion is the following highlighted line: UserProfile profile = JsonConvert.DeserializeObject<UserProfile>(responseString);. This line represents the name of the user, which has been deserialized from the JSON response and is presented in the View.
    You can call the Graph API using HttpClient and handle the raw data yourself, but an easier way is to use the Graph Client Library which is available via NuGet. The Client Library handles the raw HTTP requests and the transformation of the returned data for you, and makes it much easier to work with the Graph API in a .NET environment. See the related Graph API code samples on GitHub.